


I created a guide per coverage in "Hartman-Kester" in "Principles of Plant Propagation" (1989) of which is called "June Budding" and as kind of a guarantee to those leaving scion events having picked up the wrongly identified (free) scions. Of having recommend this to other programs this year where bud-wood is sent out since it is actually for me more reliable when grafting and to our outdoor conditions in not having the luxury of a great greenhouse (ie. plant hospitals) the growers do. 🙂
There is one minor difference between the Hartman-Kester method in that we are using one year old wood (not current seasons) as a root-stock. So that is the only single style change with numerous other minor additions for those with less than average eye-sight such as precision cuts with angles which come in handy when you can see the hangups or catch-points. We remove the wood and the bud folds too easy. The antibiotic solution is there to ensure starters of budding in "June" can have a way slow way of succedding at this that the bud can be protected in solution for a couple hours. I certainly needed time due to a clumsy cell-phone camera indeed!! 🙂
My buds were collected from interior Alaska yesterday about 4:am. I guess with camera they took over an hour and I am obviously done but also happy with the way everything went together for almost everything but the possible other factors that might creep in later such as graft rejection and the two types of clonal material I'm choosing to use. All night my scion-wood stayed refrigerated as well.
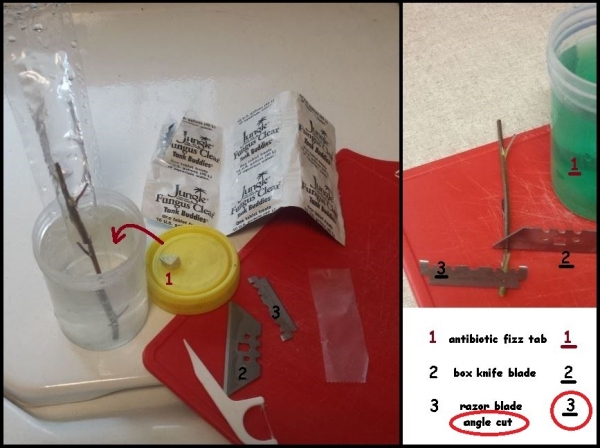
:: materials with the method ::
To this point with the above illustration is the complete description of things you need or might recognize. If not please ask. The circled step-3 is important to indicate the one angle 45 degree cut on the one blade ..again somebody can ask me why later. My bud-wood was barely mature enough. I had to work with the base bud as the rest had no wood feel to the inside.
We here in the 4-way composite picture (figure 1-4) will want to find a great chance to do these steps near a sunny window as this involves what I think is the most tedious and kind of difficult if not followed out the proper way removing the wood piece with proper care of having the point of wood backing remaining intact to the bud, and the wood must be pulled forward. Work with the right shape of plastic flossing tool as not all look the same. Not always but sometimes I find a bud easier when (gently) freed on all sides works best, then twist and pull the wood. In Alaska I found a toy plane with a perfectly shaped propeller blade, but it was too flimsy to do any forcing out of the wood piece.
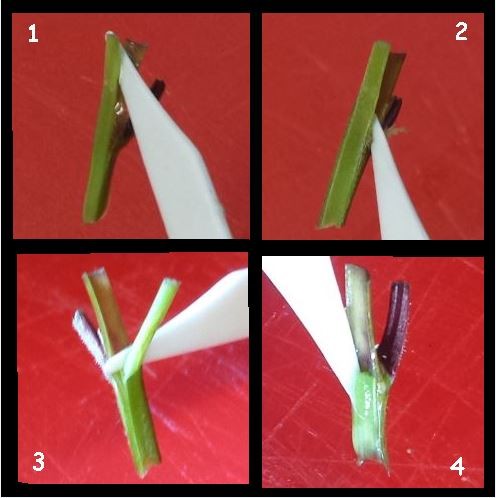
:: steps 1-4 ::
All these next are moving outside and onto a sweet cherry in my garden. I bought it retail as a 'sweet heart' cultivar, which it isn't so I found a good place there to fix my now prepared bud of prunus pensylvanica cherry that is already waiting in the blue antibiotic solution above. These are in an order of sequences of 6 steps of which is a little more time constraining since we are not in a hospital like situation or free of floating diseases that can enter into these cuts.
[ see steps outdoor-1 to Outdoor-6 below ]
Where the above is step-A, What happens here -step-B (day 4-5) are pruning in order to twice force the grafted bud into the dominantly recognized position.

...then in about another 8 days I will re-visit here and cut all possible other points of growth from the original cherry rootstock. (eg. future step-C)
...then in another 10 days after step-3 new growth on the new bud should become apparent.

Today I decided to update and remove covering for inspection. It was time to prune back anyways. At this stage I usually see callous developing all around the circumference which I don't see here in the 2 bottom frames. Also my rootstock cherry is looking more every day having yellowing on more older leaves. Because my rootstock is in well balanced and enriched soil the leaf problem is an indicator of a virus and is also that effecting the slower callousing at the bud. In this graft it seems the rootstock is not wanting to reject the bud the way hypersensitive rootstocks like shirofugen would do, but in this case the rootstock is still stressed. For example the bud is still green but the development of the rootstock has slowed.
However the above is just my "hypothesis" and so any future followup here "may" shift more into a proper diagnosis on the underlying threat and what it really is.
Not shown in the picture below were dormant scions of flowering cherry (behind me) that I cleft or bark grafted a couple of months ago. I had tried 2 types of flowering cherry, likely of which one were from a hypothetically infected viral source in turn resulted as such yellowing for instance 4th frame. The "behind me" scion grafts started from Japanese shirofugen, which is interesting since that cultivar is hypersentitive (ie. will attack the virus by "walling"), and the probable reason the shirofugen graft failed on me a month ago; while the other Japanese (cultivar unknown) is just fine, maybe slightly too yellow, but different from the yellowing of main rootstock.
No worries for me because I properly sanitize my tools as I have for years with Lysol spray cans moving one tree after another. I am also lucky to have indicator tolerant plants (exactly opposite of hypersensitive) from WSU that will aid in this experiment. 🙂

Update: The above method that I used in June did not have any good story in the end as a result of a cherry borne virus. However the same method in May with plum stock krymsk-1 in a two gallon pot did produce an 8 foot tall plum tree in the same pot!! 🙂
A gardener friend of mine in Lebanon OR got the potted graft that I made for him. Larry used traces of epsom salts for magnesium boosting and a miracle grow brand of chemicals with that. I suppose the tree is kind of having an addiction to chemicals by now, but that's not so much the point as how it is possible to use such a method of grafting with a good rate of take when the sources of plant materials are clean.
January/2020 Winter Additive & Update:
Idyllwild
jafar
Marsha H
Viron
1 Guest(s)